December 22, 2024

বাংলাদেশের শ্রম আইন: একটি সম্পূর্ণ গাইড
আপনি কি বাংলাদেশে শ্রম আইন সম্পর্কে বিস্তারিত জানতে চান? চাকরিদাতা বা কর্মচারী হিসেবে, শ্রম আইনের জ্ঞান কর্মক্ষেত্রে আপনার অধিকার এবং দায়িত্ব সম্পর্কে সচেতন হতে সাহায্য করে।

এই নিবন্ধে আমরা বাংলাদেশের শ্রম আইন, এর মূল বৈশিষ্ট্য এবং চাকরিদাতা ও কর্মচারীদের জন্য গুরুত্বপূর্ণ বিষয়গুলো নিয়ে আলোচনা করেছি।


বাংলাদেশের শ্রম আইন কী?

বাংলাদেশের শ্রম আইন এমন কিছু নিয়ম-কানুন যা কর্মচারীদের ন্যায্য অধিকার রক্ষা করে এবং চাকরিদাতাদের সঠিকভাবে কর্মীদের পরিচালনা করতে সহায়তা করে।


বাংলাদেশের শ্রম আইনের মূল বৈশিষ্ট্য

১. কর্মঘণ্টা এবং অতিরিক্ত কাজের নিয়ম

  • প্রতিদিন ৮ ঘণ্টা এবং প্রতি সপ্তাহে ৪৮ ঘণ্টা কাজ করার অনুমতি।
  • অতিরিক্ত কাজের জন্য ১০ ঘণ্টা পর্যন্ত অনুমোদিত, এবং এই সময়ের জন্য দ্বিগুণ বেতন প্রদান করতে হবে।

২. ছুটির নিয়ম

  • বার্ষিক ছুটি: প্রতি ১৮ দিনের কাজের জন্য ১ দিন।
  • সিক লিভ: প্রতি বছরে ১৪ দিন।
  • মাতৃত্বকালীন ছুটি: ১৬ সপ্তাহ (৮ সপ্তাহ প্রসবের আগে এবং পরে)।

৩. মজুরি ও বেতনের নিয়ম

  • সরকার নির্ধারিত ন্যূনতম মজুরি মানতে হবে।
  • বেতন অবশ্যই পরবর্তী মাসের ৭ তারিখের মধ্যে প্রদান করতে হবে।

৪. চাকরি সমাপ্তি ও ছাঁটাই

  • অসদাচরণের জন্য চাকরিচ্যুতি: যথাযথ তদন্ত ও নথিপত্র প্রয়োজন।
  • ছাঁটাই: লিখিত নোটিশ এবং প্রতি বছরের জন্য ৩০ দিনের মজুরি সমপরিমাণ ক্ষতিপূরণ।

৫. কর্মক্ষেত্রের স্বাস্থ্য ও সুরক্ষা

চাকরিদাতার দায়িত্ব:

  • নিরাপদ পরিবেশ, বিশুদ্ধ পানি, এবং ফার্স্ট এইড সরবরাহ করা।
  • স্বাস্থ্য সুরক্ষা মান বজায় রাখা।


Last Edit: 22-December-2024

Labor Laws in Bangladesh: A Complete Guide for Employers and Employees
Are you looking for a comprehensive guide to labor laws in Bangladesh? Whether you’re an employer managing a team or an employee safeguarding your rights, understanding the Bangladesh Labour Act, 2006, is essential.

This article breaks down the key features of labor laws in Bangladesh, highlighting rights, responsibilities, and the importance of compliance for businesses and workers.


What Are Labor Laws in Bangladesh?

Labor laws in Bangladesh are a set of regulations designed to ensure fair treatment for employees while providing employers with structured guidelines for workforce management. Let’s explore the most critical aspects of these laws.


Key Features of Labor Laws in Bangladesh

1. Working Hours and Overtime Rules

  • Maximum 8 hours per day and 48 hours per week.
  • Overtime is allowed up to 10 hours per day, with wages at twice the regular rate.

2. Leave Entitlements

  • Annual Leave: One day for every 18 days worked.
  • Sick Leave: 14 days of paid sick leave annually.
  • Maternity Leave: 16 weeks (8 weeks before and after childbirth).

3. Wages and Payment Policies

  • Minimum wages are determined by the government and must be strictly followed.
  • Employers must pay wages by the 7th of the next month to avoid penalties.

4. Termination and Retrenchment Guidelines

  • Termination for Misconduct: Requires proper inquiry and documentation.
  • Retrenchment: Employers must provide written notice and compensation equivalent to 30 days’ wages per year of service.

5. Workplace Health and Safety

Employers are responsible for:

  • Providing clean drinking water, proper ventilation, and first-aid facilities.
  • Maintaining overall workplace safety standards.

Why Are Labor Laws Important in Bangladesh?

Labor laws protect employees’ rights, ensuring they work under fair conditions. For employers, compliance reduces the risk of legal disputes and fosters trust among workers.

Benefits of Compliance

  • For Employers: Legal protection, higher productivity, and improved employee satisfaction.
  • For Employees: Better working conditions, fair wages, and job security.

Last Edit: 22-December-2024

December 07, 2024

নিজের অর্জন করা কিছু গুরুত্বপূর্ণ শিক্ষা

১) সম্মান করতে শিখুন, ভালো ব্যবহার করুন। নিজেকে বাঁচিয়ে রাখার মত নতুন নতুন পরিবার পাবেন। যেগুলো আপনার রক্তের নয়। 

২) কেউ আপনার সাথে পিরিত করতে আসবে না। যদি তাকে লাভবান করে দিতে পারেন, সেও আপনাকে লাভবান করে দেবে। 

৩) কিছু মানুষ আপনাকে বাঁশ দিয়ে চলে যাবে, তাকে উল্টো বাঁশ না দিলে। অন্যদেরকেও বাঁশ দিতে থাকবে। পৃথিবীতে অরাজকতা হবে। আইনের সহায়তা নিতে পারেন। 

 ৪) অল্পতেই পাওয়া ফসল বা কর্মফল, কখনও ভালো হয় না। 

৫) কিছু মানুষ আপনাকে কখনও মূল্য দিবে না, এই মানুষগুলো আপনার জীবনে কখনো কাজে আসবে না। তাই তাদের থেকে দূরে থাকুন। 

৬) নেশা থেকে দূরে থাকুন, বাস্তব জীবন অনেক সুন্দর। 

৭) অর্থ উপার্জন করতে শিখুন, নিজেকে নিজেই তৈরি করুন। 

৮) যারা কোনো কিছু নিয়ে অহংকার করে, তাদের থেকে দূরে থাকুন। 

৯) সব মানুষকে বা তার জীবনকে নিয়ে হাঁসি ঠাট্টা করতে হয় না। কারণ সবার জীবন আপনার মত সহজ না‌। তার জীবন তার অনেক কষ্টের ফসল। 

১০) সময়কে গুরুত্ব দেওয়া উচিৎ। প্রাকৃতিক নিয়ম অনুসরণ করা উচিৎ। 

১১) সবাই একদিন না একদিন সফল হয়। তাকে খারাপ কথা/গালাগালি করে অপমানিত করা উচিৎ নয়। 

১২) যে আপনাকে বোঝে না। তাকে বোঝানোর জন্য সময় ব্যয় না করাটাই উত্তম। 

 ১৩) যেটা আপনি নিজে পারেন, সেটা নিজেই করে ফেলুন। আত্মবিশ্বাস চলে আসবে। 

 ১৪) যারা আপনাকে নিংড়ে খায়, তাদের থেকে দূরে থাকুন। অন্যথা বিশাল ক্ষতি হয়ে যাবে। 

১৫) জীবনের সব কথা সবাইকে বলতে হয় না। 

১৬) যে অন্যের ক্ষতি করে আপনাকে লাভবান করে, তার থেকে দূরে থাকুন। কারণ একদিন সেও আপনাকে ক্ষতি করবে। 

১৭) আবেগ দিয়ে কিছু হয় না। 

১৮) কিছু পাওয়ার জন্য অনেক সময় অনেক কিছু ত্যাগ (sacrifices) করতে হয়। 

ভালো লাগলে শেয়ার দিয়ে টাইমলাইনে রেখে দিতে পারেন। অনেক সময় নিয়ে লিখেছি। কপি করবেন না। কারণ এই লেখাটি আরো অনেক যায়গায় থাকবে। 

#শিক্ষা #জ্ঞান #অর্জন

January 07, 2024

Configuring Odoo: A Comprehensive Guide to Odoo.conf

Configuring Odoo is a crucial step in ensuring optimal performance and functionality.


The odoo.conf file plays a central role in customizing the behavior of your Odoo server. In this article, we'll walk through a well-organized odoo.conf file, highlighting key parameters and explaining their significance. By the end, you'll have a clearer understanding of how to tailor Odoo to your specific requirements. 

1. Setting Administrator Password

admin_passwd = admin_password

Specify the admin password to secure your Odoo instance. 

2. Database Configuration

db_host = False
db_port = False
db_user = odoo
db_password = db_password
db_name = odoo

Configure database-related parameters, including host, port, user, password, and name. 

3. Timezone Configuration

timezone = UTC

Set the timezone for your Odoo server, ensuring accurate time representation. 

4. XML-RPC and Web Interface Configuration

xmlrpc_interface = 127.0.0.1
xmlrpc_port = 8069
netrpc_interface = 127.0.0.1
netrpc_port = 8072

Define the XML-RPC and web interface addresses and ports for server communication. 

5. Addons Configuration

addons_path = /path/to/your/custom/addons,/path/to/odoo/addons

Specify the paths to your custom addons and the default Odoo addons. 

6. Logging Configuration

log_level = info
logfile = /var/log/odoo/odoo.log

Configure logging settings, including log level and file location. 

7. Additional Settings

demo = False
auto_reload = False
workers = 4
limit_time_cpu = 300
db_maxconn = 64
Adjust various settings such as enabling or disabling demo data, auto-reloading modules, defining the number of workers, setting CPU time limits, and controlling database connections. By following this guide, you'll be equipped to create a well-organized odoo.conf file tailored to your specific deployment needs. Remember to restart your Odoo service after making changes for them to take effect.

October 20, 2023

Enabling Remote Connections to PostgreSQL on Ubuntu

Enabling remote connections to a PostgreSQL server on Ubuntu 20.04 involves several steps to configure the PostgreSQL server and open up the necessary ports. Additionally, I'll provide information on changing the password for an existing PostgreSQL user if needed.


Step 1: Modify the PostgreSQL Configuration File

Open the PostgreSQL configuration file "postgresql.conf" using a text editor. The file is typically located in the /etc/postgresql/12/main directory. To open the file from the Linux Terminal, execute:

sudo nano /etc/postgresql/12/main/postgresql.conf

Find the line #listen_addresses = 'localhost' and uncomment it by removing the # character at the beginning of the line.

Next, change the value of listen_addresses to "*", allowing PostgreSQL to listen on all available IP addresses. Alternatively, you can specify a specific IP address or a range of IP addresses that are allowed to connect to the server.

Step 2: Modify the pg_hba.conf File

Open the "pg_hba.conf" file using your preferred text editor, typically located in the /etc/postgresql/12/main directory. To open the file from the Linux Terminal, execute:

sudo nano /etc/postgresql/12/main/pg_hba.conf

Find the section that allows local connections and modify it as follows:

# IPv4 local connections: host all all 127.0.0.1/32 md5

Change it to allow connections from any IP address (0.0.0.0/0):

# IPv4 local connections: host all all 0.0.0.0/0 md5

Step 3: Allow Port 5432 Through the Firewall

To enable traffic on port 5432 through the firewall, execute the following command:

sudo ufw allow 5432/tcp

Step 4: Restart PostgreSQL

Restart the PostgreSQL service to apply the changes:

sudo service postgresql restart

Changing the Password for an Existing PostgreSQL User:

If you need to change the password for an existing PostgreSQL user, you can follow these steps:

Log in to the PostgreSQL database as a superuser or a user with administrative privileges. You can do this by using the psql command:

sudo -u postgres psql

Change the password for the user using an SQL command. Replace username with the actual username and new_password with the new password you want to set:

ALTER USER username WITH PASSWORD 'new_password';

Exit the PostgreSQL prompt:

\q

After completing these steps, you should be able to connect to the PostgreSQL server from a remote machine and have successfully changed the password for an existing user. However, please keep in mind that allowing remote access to a PostgreSQL server can pose security risks. Therefore, it's recommended to use strong passwords, encryption, and firewall rules to protect your system.


September 29, 2023

ReactXO is a simple web-based game developed in React


ReactXO

ReactXO is a simple web-based game developed in React that emulates the classic game of Tic Tac Toe, but with a modern twist. Challenge your friends or play against the computer to see who can achieve victory in this entertaining game of Xs and Os.

Table of Contents

  • Demo
  • Features
  • Getting Started
  • Usage
  • Contributing
  • Screenshot

Demo

You can check out a live demo of ReactXO here.

Features

  • Play Tic Tac Toe with a modern, responsive interface.
  • Choose to play against a friend or an AI opponent.
  • Engaging animations and user-friendly design.
  • Keep track of the game's history and move through previous moves.

Getting Started

To run ReactXO locally on your machine, follow these steps:

  1. Clone this repository to your local machine:

  2. Navigate to the project directory:

    cd reactxo

  3. Install the required dependencies using npm:

    npm install

  4. Start the development server:

    npm start

  5. Open your web browser and visit http://localhost:3000 to play ReactXO.

Usage

  • Upon launching the game, choose whether you want to play against a friend or against the computer (AI).
  • Take turns placing your symbol (X or O) on the grid by clicking on an empty cell.
  • The game will automatically detect a winner or a draw and display the result.
  • You can also view the game's history by clicking on the "History" button and jump back to any previous move.

Contributing

Contributions are welcome! If you'd like to contribute to ReactXO, please follow these guidelines:

  1. Fork the repository on GitHub.
  2. Clone your forked repository to your local machine.
  3. Create a new branch for your feature or bug fix.
  4. Make your changes and commit them with descriptive commit messages.
  5. Push your changes to your GitHub fork.
  6. Submit a pull request to the original repository, describing the changes you've made.

Screenshot
ReactXO

September 19, 2023

Managing Linux Processes: A Comprehensive Guide to Viewing and Killing Running Processes

 Introduction:

Linux is a versatile and powerful operating system used in various environments, from servers to desktops. One of its crucial aspects is process management. Knowing how to view and manage running processes is essential for system administrators and regular users alike. In this article, we’ll explore how to check all running processes on Linux and discuss the process of killing them when necessary.

Managing Linux Processes

Viewing Running Processes:
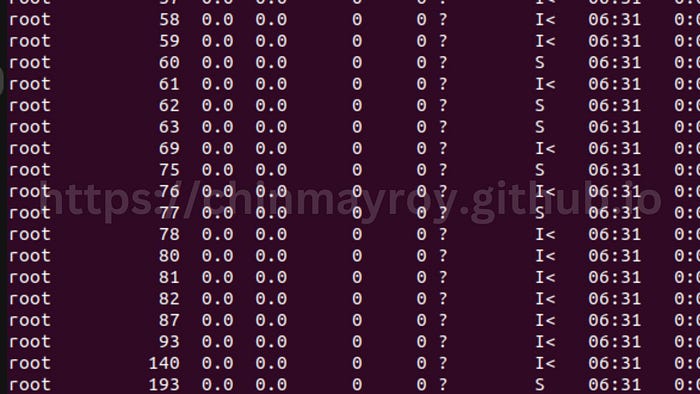
To check all running processes on Linux, you can use the ps command. There are several ways to use ps, but one of the most common and informative methods is:

ps aux
  • ps: This is the command for displaying information about running processes.
  • aux: The options "a" and "u" stand for "all users" and "user-oriented output," respectively. This combination provides a detailed list of all processes running on the system.

When you execute this command, you’ll see a table with various columns containing information about each process. Some of the essential columns include:

  • USER: The owner of the process.
  • PID: The Process ID, a unique identifier for each process.
  • %CPU: The percentage of CPU usage by the process.
  • %MEM: The percentage of RAM (memory) usage by the process.
  • VSZ: Virtual memory size in kilobytes.
  • RSS: Resident Set Size, the portion of a process's memory that is held in RAM.

Killing Processes:
Sometimes, you may need to terminate a running process, either because it’s unresponsive or consuming too many system resources. To do this, you can use the kill command. Here's the basic syntax:

sudo kill -9 PID 
  • sudo: This command is used to execute another command with superuser privileges, which are often required to kill processes owned by other users or system services.
  • kill: The primary command for terminating processes.
  • -9: This is a signal number (SIGKILL) that forcefully terminates the process. It should be used cautiously, as it doesn't allow the process to clean up after itself, potentially leading to data corruption or other issues.
  • PID: Replace this with the Process ID of the process you want to kill.

For instance, if you want to terminate a process with a PID of 12345, you’d run:

sudo kill -9 12345

Alternatively, you can use the pkill command to kill processes by their name:

sudo pkill process_name
  • process_name: Replace this with the name of the process you want to terminate.

Conclusion:
Understanding how to view and manage running processes is a fundamental skill for any Linux user or administrator. The ps aux command provides valuable insights into the processes running on your system, while the kill command allows you to terminate processes when necessary. However, exercise caution when using the -9 option with kill, as it can have unintended consequences. Always ensure that you are terminating the correct process, especially when working with critical system processes.

By mastering process management on Linux, you’ll have better control over your system’s performance and stability, ensuring that it operates smoothly and efficiently.

February 14, 2023

How To Install wkhtmltopdf on Ubuntu 22.04
There are 3 ways to install wkhtmltopdf on Ubuntu 22.04. We can use apt-get, apt and aptitude. In the following sections we will describe each method. You can choose one of them. 
  1. Install wkhtmltopdf Using apt-get
  2. Install wkhtmltopdf Using apt
  3. Install wkhtmltopdf Using aptitude


1. Install wkhtmltopdf Using apt-get

Update apt database with apt-get using the following command.
sudo apt-get update
After updating apt database, We can install wkhtmltopdf using apt-get by running the following command:
sudo apt-get -y install wkhtmltopdf

2. Install wkhtmltopdf Using apt

Update apt database with apt using the following command.
sudo apt update
After updating apt database, We can install wkhtmltopdf using apt by running the following command:
sudo apt -y install wkhtmltopdf

3. Install wkhtmltopdf Using aptitude

If you want to follow this method, you might need to install aptitude first since aptitude is usually not installed by default on Ubuntu. Update apt database with aptitude using the following command.
sudo aptitude update

After updating apt database, We can install wkhtmltopdf using aptitude by running the following command:
sudo aptitude -y install wkhtmltopdf

How To Uninstall wkhtmltopdf on Ubuntu 22.04

To uninstall only the wkhtmltopdf package we can use the following command:
sudo apt-get remove wkhtmltopdf
Uninstall wkhtmltopdf And Its Dependencies

To uninstall wkhtmltopdf and its dependencies that are no longer needed by Ubuntu 22.04, we can use the command below:
sudo apt-get -y autoremove wkhtmltopdf

Remove wkhtmltopdf Configurations and Data

To remove wkhtmltopdf configuration and data from Ubuntu 22.04 we can use the following command:

sudo apt-get -y purge wkhtmltopdf
Remove wkhtmltopdf configuration, data, and all of its dependencies

We can use the following command to remove wkhtmltopdf configurations, data and all of its dependencies, we can use the following command:
sudo apt-get -y autoremove --purge wkhtmltopdf

Source 

wkhtmltopdf website
wkhtmltopdf on packages.ubuntu.com

Conclusion

In this tutorial we learn how to install wkhtmltopdf package on Ubuntu 22.04 using different package management tools: apt, apt-get and aptitude.

January 19, 2023

How to Install Python 3.8 on Ubuntu 16.04


Installing Python 3.8 on Ubuntu with Apt

Installing Python 3.8 on Ubuntu with apt is a relatively straightforward process and takes only a few minutes:

  1. Run the following commands as root or user with sudo access to update the packages list and install the prerequisites:

    sudo apt update
    sudo apt install software-properties-common
    
  2. Add the deadsnakes PPA to your system’s sources list:

    sudo add-apt-repository ppa:deadsnakes/ppa
    

    When prompted press Enter to continue:

    Press [ENTER] to continue or Ctrl-c to cancel adding it.
    
  3. Once the repository is enabled, install Python 3.8 with:

    sudo apt install python3.8
    
  4. Verify that the installation was successful by typing:

    python3.8 --version
    
    Python 3.8.0
    

At this point, Python 3.8 is installed on your Ubuntu system, and you can start using it.

Installing Python 3.8 on Ubuntu from Source

In this section, we’ll explain how to compile Python 3.8 from the source.

  1. Update the packages list and install the packages necessary to build Python:

    sudo apt update
    sudo apt install build-essential zlib1g-dev libncurses5-dev libgdbm-dev libnss3-dev 
    libssl-dev libreadline-dev libffi-dev wget
    
  2. Download the latest release’s source code from the Python download page using wget:

    wget https://www.python.org/ftp/python/3.8.0/Python-3.8.0.tgz
    

At the time of writing this article, the latest release is 3.8.0.

  1. When the download finishes, extract the gzipped archive:

    tar -xf Python-3.8.0.tgz
    
  2. Switch to the Python source directory and execute the configure script which performs a number of checks to make sure all of the dependencies on your system are present:

    cd Python-3.8.0
    ./configure --enable-optimizations
    

The --enable-optimizations option optimizes the Python binary by running multiple tests. This makes the build process slower.

  1. Start the Python 3.8 build process:

    make -j 8
    

For faster build time, modify the -j to correspond to the number of cores in your processor. You can find the number by typing nproc.

  1. When the build process is complete, install the Python binaries by typing:

    sudo make altinstall
    

Do not use the standard make install as it will overwrite the default system python3 binary.

  1. That’s it. Python 3.8 has been installed and ready to be used. Verify it by typing:

    python3.8 --version
    

    The output should show the Python version:

    Python 3.8.0
    

Feedback

You have installed Python 3.8 on your Ubuntu 16.04 machine, and you can start developing your Python 3 project.

If you have any questions or feedback, feel free to comment below.

#python #Ubuntu

November 11, 2022

মেধা থাকলেও লাভ নাই, যদি না পকেটে থাকে টাকা!
মেধা থাকলেও লাভ নাই, যদি না পকেটে থাকে টাকা! 

আপনাদের একটা ঘটনা বলি তাহলে আমার কথার সাথে আপনাদের চিন্তা ভাবনার মিল হবে।
গত বুধবার রাতে, রাস্তা দিয়ে কি যেন চিন্তা করতে করতে পায়ে হেটে বাসায় ফিরতেছিলাম। হঠাৎ আটকে গেলাম! মানে, কে যেন আমার পা আকড়ে ধরেছে? তাকিয়ে দেখি এক ভিক্ষুক। আমি তাকানোর সাথে সাথেই বলা শুরু করল:- স্যার কিছু টাকা ভিক্ষা দিন, খাবার কিনে খাব। আমি বললাম পা ধরছেন কেন, তাড়াতড়ি ছাড়েন না হলে পুলিশ ডাকব। ভিক্ষুক বলে:- তারপরও আপনার পা আমি ছাড়তে রাজি না। মনে মনে ভাবলাম, মহা বিপদে পড়লাম তো। তারপর ভিক্ষুককে বললাম, আমি আপনাকে ভিক্ষা দেওয়ার মত সামর্থ অর্জন করিনি। তারপর পা ছেড়ে দিল। 

 :::::::
ভিক্ষুকের মেধা ঠিকই আছে, কিন্তু পকেটে টাকা নাই। তাই বলে সে ভিক্ষা করে। অনেকের টাকা আছে কিন্তু ....................। দুইটাই পরস্পরের সাথে ওতপ্রোতভাবে জড়িত। বাস্তবে>>>আচ্ছা গভীরে না জাই। ধন্যবাদ।

 #ভিক্ষুক #motivation #motivation

September 29, 2022

How to write Linkedin About Section | 7 steps write Linkedin About Section

 7 steps to write Linkedin About Section

7 steps to wirte Linkedin About Section
7 steps to write linkedin about section

If you want to write a beautiful linkedin about section then please follow this 7 steps. 

1. Declare your current position and your location

I’m working as a “software engineer”. I’m living in the City, Country.

2. Talk about your experience

I’ve more than three or 3+ years experience as a “software engineer”.

3. Write down your skills

I’ve arranged this list of my recent set of skills:

  •  Tools: Adobe Illustrator, Photoshop, XD, WordPress.

  •  Tools: Adobe Illustrator, Photoshop, XD, WordPress.

  •  Tools: Adobe Illustrator, Photoshop, XD, WordPress.

  •  Tools: Adobe Illustrator, Photoshop, XD, WordPress.

You can add skills which are suitable to you.

4. Talk about your childhood or after childhood. How did you get the interest?

I started learning to code when I was a teenager, though it was always more of a hobby than a career focus. After secondary school education in Science, and continuing to pursue that hobby, I realized software engineering was the right field for me.

5. Talk your previous experience

Since then, I’ve worked on countless freelance projects and have been involved with a handful of notable startups. Today, I’m working as a designer with the amazing team at XYZ company., and am getting into backend development and machine learning on my own time.

6. Talk more about your interest

I’m familiar with a variety of programming languages, including Python 3. X(Expert), C/C++(Proficient), Java(Proficient), HTML, and CSS, but I’m always adding new skills to my repertoire. I’m also eager to meet other software engineers in the area, so feel free to connect!

7. Write Invite message to get call or reply

I want to add more that I’ve good communication skills, leadership, and people management skills. I also always try to be supportive of my team members.


Thanks for reading. Please share with your friends. If you have feedback then please comment down bellow.